

Cold frames can vary in size: 3 feet in depth by the use of 6 feet long is the size of an average home garden cold frame. The once more facet of a frame is usually taller (ceaselessly 18 to 24 inches high) than the doorway (typically 8 to 12 inches high) with the clear best possible sloping down from once more to front allowing rain to run off and sunshine to flood in. The taller the frame the taller the plants it will accommodate. A area garden cold frame need be no deeper than a person’s reach (24 to 36 inches); this will allow plants to be tended without getting into into the frame.
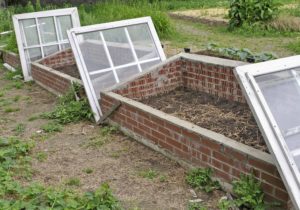
Picket-sided frames are will also be manufactured from long-lasting wood that has now not been chemically treated: well-cured pine, cypress, redwood, or chestnut can be used. The translucent best possible or lid of the cold frame will also be created from an ordinary window sash–more or less 3 by the use of six feet. A variety of sashes will also be located in a row to make a prolonged cold frame. Sheets of Plexiglass or other plastic sheeting moreover will also be framed to create the cold frame lid. The lid or sash is usually hinged to the once more facet of the frame alternatively an unhinged lid can simply rest at the most productive of the frame.
Cold Frame Building
Proper right here’s how you’ll be able to make a simple cold frame: Collect the frame with 2 x 8 inch or 2 x 10 inch or 2 x 12 inch boards decrease to size to form the sector. Cut back the facet boards on a diagonal so that the doorway (southward-facing facet) of the frame isn’t as much as the once more. 5-inch nails or screws and 4-inch metal fasteners can be used to hold the sides together. Hinge the lid of the frame to the once more. The absolute best will also be created from an out of date window sash or framed Plexiglas. Set the corners of the frame relatively beneath grade on bricks to stop the frame from settling. Fill in around the frame with soil to stick the cold out. You can assemble a higher-sided cold frame by the use of together with framed tiers atop a framed box or an present raised-bed frame.
If you do not want to cut the facet boards diagonally, do this: Fasten two wooden stakes to the once more plank; energy the stakes into the ground to about five or six inches leaving the once more plank two or 3 inches above the ground–the once more plank will have to, if truth be told, be degree. The doorway plank is sunk two or 3 inches into the ground and held upright by the use of stakes on the outdoor, nailed on. Remove enough soil from right through the frame to monetary establishment up the facet planks about halfway, thus sloping the frame from once more to front. Fill inside the soil along the sides and once more of the frame. Attach or set on the translucent lid or sash.
The placement of your cold frame will have to be where the photo voltaic will strike most in an instant–coping with south inside the Northern Hemisphere–and where it will be sheltered from the north. Set the frame on the south facet of a development or fence to thrust back north winds. Even a hedge or low emerging shrubs to the north of the frame will give protection to it.
Cold frames for extraordinarily cold winter spaces. In very cold winter spaces, cold frames will also be fitted with insulated aspects and set atop insulated foundations to retain further heat. A wooden, cement block, or cast cement cold frame will also be insulated merely with the addition of 2 or further inches of Styrofoam around the inside the frame and with a layer of 1½ inches on the bottom underneath the emerging bed. Insulating foam will also be merely decrease and stuck or tacked to the inner of the frame. As properly foam shutters or mats will also be located atop the frame’s clear lid at night time. Insulation can increase night time air temperature right through the frame by the use of 8°F or a lot more. A double-paned glass or plastic best possible or a sash fitted with an under-layer of 4 to 6 mil plastic sheeting will provide additional insulation of up to 6°F.
To further insulate a cold frame in very cold winter spaces, place hay bales or baggage of leaves around the outdoor of the frame. Tarps, woven mats, and out of date blankets can be used to be in agreement insulate the absolute best; this additional protection can increase the temperature right through the frame by the use of 6°F at night time. The internal of a frame will also be painted white to replicate sunlight or black to retain heat. Thermal collectors as simple as masonry blocks or jugs of water set towards the north wall of a frame will retain photograph voltaic heat all over the day that is introduced once more into the frame at night time.
Cold Frame Sash
The clear or translucent best possible or cover of the frame may be referred to as by the use of different names: lid, sash, glazing, or gentle. The absolute best will also be manufactured from glass or rigid fiberglass, acrylic, Plexiglass, or UV-stabilized polyethylene plastic. Space-made cold frames ceaselessly use out of date typhoon domestic home windows for lighting fixtures. The light is usually hinged in the back of the frame for easy raising and decreasing and air float. Then again a frame best possible can also simply slide on and off the frame.
A best possible sash with a double layer of glass (or plastic) is more healthy than a single pane or layer. The gap between the double layers of glass provides a cushion of insulating air between the upper and reduce glass and will eliminate the need for best possible mats, blankets, or other covers to stick the frame warmth on very cold nights.
The absolute best will have to always be unfastened to be opened to ventilate the frame. You can ventilate the frame by the use of simply propping a stick or block underneath the sash. There are ways to make opening and closing the sash much more simple: an automatic solar-powered frame opener hooked as much as a thermostat can lift the absolute best when the inner temperature inside of reaches above 70°F.
Place some other layer of protection right through the cold frame:
When temperatures are very cold, a second layer of protecting right through the cold frame can add to plant protection. Poly row covers or plant blankets right through the frame will keep the temperatures spherical plants a few ranges warmer than the temperature right through the frame and a number of other different ranges warmer than the outdoor temperature. Many cold hardy vegetables can live to tell the tale temperatures down to 10°F; the objective of a second protecting right through the frame is to protect plants from temperatures that low.
The objective of a double cover inside of a cold frame is not to extend the emerging season alternatively to extend the harvest season or to allow plants to over-winter for renewed growth in spring. Use lightweight row covers that may allow air and lightweight to head by the use of. A double cover will build up humidity which moreover will build up protection.
Place row covers over vegetation right through the frame merely forward of the weather gets cold enough to freeze right through the cold frame. Be sure that the row cover subject material does now not touch plant tissue in freezing local weather. Row covers right through the frame will also be supported by the use of wire hoops.
Earth-sided cold frame:
If creating a cold frame from wood or cement blocks is not an risk, there may be an alternative. You can make a brief cold frame from earth–essentially grading up the soil spherical your planting bed to protect it. One way to take a look at that is to make one of those cold frame mould into which you’ll be able to pack soil to form your earthen frame aspects. Use scrap wood to make a box mould with flared aspects. Place the mold along the sides of the bed where you intend to sow seeds and hill up the earth into the mold and pack it firmly along side your feet or a tamper. You can then place your sash or plastic lid atop the “frame.” When the weather warms and the plants are established you’ll be able to use a hoe or spade to remove the earthen walls.


